Installation
Welcome to WinGeno — a free, privacy-first genogram editor for social workers, family therapists, and researchers.
Download the package for your platform from wingeno.app.
- Windows: Run
WinGenoSetup.exeand follow the wizard. The.genofile extension is registered automatically. - Windows Portable: Extract
WinGenoSetup.zipand execute the application. - macOS: Open
WinGenoSetup.dmgand drag WinGeno to your Applications folder. - Linux: Make
WinGeno.AppImageexecutable (chmod +x WinGeno.AppImage) and run it directly. - Android: Install
WinGeno.apk. Allow installation from unknown sources in your device settings if prompted.
Browser Version
The browser version at try.wingeno.app runs entirely in your browser — nothing is sent to any server and no installation required.
Limitations:
- Files are not saved.
- Recent files are not preserved between browser sessions.
- PDF export and printing are not supported in the browser version. Use the desktop app for PDF output.
Your First Genogram
When WinGeno starts, an empty canvas is shown. Follow these steps to create a basic three-generation genogram:
- Click Male or Female in the toolbar to place the first person on the canvas.
- Place a second person as the partner.
- Select both persons, then click Partner Connection and choose a relationship type (e.g. Married).
- Both persons should still be selected. If not, select them again. Now, click Add Child and choose Male Child or Female Child.
- Click any person to open their fields in the Properties panel — enter name, birth date, and other details.
- Save with File → Save (
Ctrl+S).
advertisement
Persons, Parents & Connections
| Button | Description |
|---|---|
| Male | Inserts a male person — displayed as a square. |
| Female | Inserts a female person — displayed as a circle. |
Index Person
Select a person and check Index person in the Properties panel to mark them as the subject of the genogram. Only one index person is allowed per genogram.
Deceased
Enter a Death date in the Properties panel to mark a person as deceased. A diagonal cross (X) is drawn through their symbol.
Parents
Select one person (the child) and click Add Parents in the toolbar (or right-click → Add Parents). WinGeno creates a parent pair above the person and draws the family connection automatically.
Partner Connections
Ctrl+click two persons to select them, then click Partner Connection in the toolbar and choose a type. You can also right-click one person and choose Connect — that person is pre-selected as the first partner, so you only need to click the second person to complete the connection.
| Relationship | Visual |
|---|---|
| Married | Double horizontal line between partners. |
| Divorced | Double horizontal line with two diagonal slashes. |
| Living Together | Single horizontal line. |
| Consanguineous | Double line with consanguinity marker — for related partners. |
To change an existing relationship or set the Separated flag, click the connection line and edit the Relationship field in the Properties panel.
Children & Unborn
Select two persons, then use Add Child or Add Unborn in the toolbar, or right-click a person and choose the relevant option from the context menu.
Children
| Button | Description |
|---|---|
| Biological (Male / Female) | Standard biological child of the selected couple. |
| Adopted | Adopted child — shown with a dashed line. |
| Foster | Foster child — shown with a dotted line. |
Unborn
| Button | Description |
|---|---|
| Pregnancy | Pregnancy — small triangle symbol. |
| Miscarriage | Spontaneous pregnancy loss — small filled circle symbol. |
| Stillbirth (Male / Female) | Stillborn child — small transparent gender-specific symbol with X. |
| Abortion | Intentional termination — small triangle symbol with X. |
Drawing Tools
| Tool | Description |
|---|---|
| Text Box | Adds a free-floating text label anywhere on the canvas. Use the Properties panel to change text, font size, and alignment. |
| Line | Draws a straight line. Configurable as solid or dashed, thin or thick, with or without an arrowhead at the end. |
| Freehand | Draws a freehand path — useful for highlighting areas or adding informal annotations. |
advertisement
Symbols
Click any symbol to show their properties in the Properties panel.
| Field | Description |
|---|---|
| Name | Free text — displayed below the person symbol on the canvas. |
| Birth | Birth date (full date or year only). |
| Death | Death date. When set, the person is shown as deceased. |
| Age | Calculated from birth/death dates, or entered manually. |
| Index person | Marks this person as the index person (one per genogram). |
Relationships
Click a partner connection line or child connection to show its properties.
| Field | Description |
|---|---|
| Relationship | Married, Divorced, Living Together, Consanguineous, Separated. |
| Date | Date of the event (e.g. marriage or divorce date). |
| Child type | Biological, Adopted, Foster, Pregnancy, Miscarriage, Stillbirth, Abortion. |
Texts & Lines
| Field | Applies to | Description |
|---|---|---|
| Text | Text Box | The text content of the box. |
| Font Size | Text Box | Adjustable font size. |
| Alignment | Text Box | Left / Center / Right. |
| Line Type | Line | Solid or Dashed. |
| Line Weight | Line | Thin or Thick. |
| Width | Line | Numeric width in pixels. |
| Arrow at End | Line | Adds an arrowhead at the end of the line. |
advertisement
Open & Save
Genograms are stored as .geno files — WinGeno's native file format.
- File → New (
Ctrl+N) — new empty canvas. Prompts to save unsaved changes. - File → Open (
Ctrl+O) — opens an existing.genofile. - File → Save (
Ctrl+S) — saves the current file; triggers Save As if not yet saved. - File → Save As (
Ctrl+Shift+S) — saves to a new name or location.
Recent Files
The most recently opened files are listed under File → Recent Files. Moved or deleted files are removed from the list automatically.
WinGeno 1.x Import
WinGeno can open .geno files from previous WinGeno 1.x versions. Use File → Open and select your WinGeno 1.x file. After importing, save the genogram with File → Save As under a new name.
Export
Use File → Export to export your genogram as a raster image.
- PNG — lossless, best for documents and presentations.
- JPG — smaller file size, suitable for sharing by email or web.
Print (as PDF)
Use File → Print to open the PDF setup panel with a live preview. WinGeno saves the genogram as a PDF file and opens it in your PDF reader to print.
Genogram options
| Option | Description |
|---|---|
| Fit to page | Scales the genogram to fill the page. |
| Center on page | Centers the genogram without scaling. |
| Black and white | Renders in black and white. |
| Print footer | Adds a footer with the file name and date. |
| Print legend | Adds a legend box explaining the symbols used. |
Paper & orientation
| Option | Description |
|---|---|
| Paper size | A4, Letter, and others. |
| Orientation | Portrait or Landscape. |
| Margins (mm) | Top, Bottom, Left, and Right margins in millimetres. |
Click Save PDF to choose a file location and save the PDF.
advertisement
Basic Editing
- Edit → Undo (
Ctrl+Z) — reverts the last change. - Edit → Redo (
Ctrl+Y) — re-applies a reverted change. - Edit → Cut (
Ctrl+X) — removes selected shapes to the clipboard. - Edit → Copy (
Ctrl+C) — copies selected shapes. - Edit → Paste (
Ctrl+V) — pastes from the clipboard. - Edit → Delete (
Del) — deletes selected shapes.
Selecting
- Single click — selects one shape.
- Ctrl + click — adds or removes a shape from the current selection.
- Drag a rectangle — press and hold the left mouse button on an empty area and drag; all shapes inside the rectangle are selected when you release.
- Edit → Select All (
Ctrl+A) — selects all shapes on the canvas.
Context Menu
Right-click any person or shape for quick actions:
- Connect — starts a connection from this person to another.
- Add Male Child / Add Female Child — adds a child to this person's couple connection.
- Add Parents — adds a parent pair above this person.
- Cut / Copy / Paste / Delete — clipboard and delete actions.
Right-clicking the empty canvas shows a minimal menu with Paste only.
Zoom & Pan
- Mouse wheel — zoom in / out centred on the cursor.
- Middle mouse button drag — pan the canvas.
- Right mouse button drag — pan the canvas (alternative).
- Status bar zoom indicator — click to reset zoom to 100 %.
advertisement
Language & Appearance
Open Help → Options → General and select a language. Takes effect immediately.
| Setting | Options | Notes |
|---|---|---|
| Theme | Fluent Normal, Fluent Compact, Simple | Fluent Compact uses smaller controls. Requires restart. |
| Color scheme | Light, Dark, System | System follows the OS setting. No restart needed. |
Custom Languages
WinGeno loads its UI text from plain .txt files. You can create your own translation or correct an existing one — no coding required. This works on all desktop platforms (Windows, macOS, Linux); it is not available on mobile.
Place a file named translation.xx-XX.txt in the translations folder next to the WinGeno executable (e.g. translation.pt-PT.txt for Portuguese). WinGeno picks it up automatically on the next start and adds it to the language list.
Use one of the four built-in files as your starting point — they are copied to the translations folder next to the executable on installation and contain all keys with their translated values. Each line follows the format KEY=Value; lines starting with ; are comments.
xx-XX) must be a valid BCP 47 culture code (e.g. pt-PT, nl-NL, pl-PL) — otherwise WinGeno will not recognise it.Automation
| Setting | Description |
|---|---|
| Auto-save on exit | Saves the genogram automatically when WinGeno closes. |
| Auto-load last file | Reopens the last used genogram when WinGeno starts. |
Canvas
| Setting | Description |
|---|---|
| Show grid | Displays a dot grid on the canvas. |
| Snap to grid | Snaps shapes to the nearest grid point when moving. |
| Black & white shapes | Renders all shapes in black and white on screen. |
| Toolbar position | Top, Bottom, Left, or Right. |
| Property panel position | Left or Right. |
advertisement
Use a Genogram in other Applications
Once your genogram is ready, here are three ways to use it beyond WinGeno:
-
Copy & Paste into documents — no file needed
PressCtrl+Ato select all, thenCtrl+Cto copy. Switch to Word, PowerPoint, LibreOffice or any other application and pressCtrl+V— the genogram is pasted as an image instantly. -
Export as image file
Use File → Export to save the genogram as a PNG or JPG. Then insert it into any document via its Insert Image command. Useful when you want to keep, archive, or reuse the image. -
Save as PDF
Use File → Print to save the genogram as a PDF file. WinGeno opens it automatically in your PDF viewer — ready to print or attach to a case file.
Ctrl+A then Ctrl+C, switch to Word, press Ctrl+V. Your genogram appears instantly.Genogram Symbols
A quick reference of symbols used in WinGeno genograms.
Persons
 Male
Male Female
 Male
Maledeceased
 Female
deceased
 Male
Maleindex person
 Female
index person
Relationships
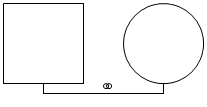 Married
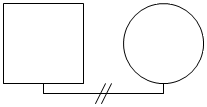 Divorced
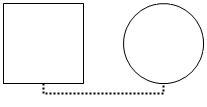 Living Together
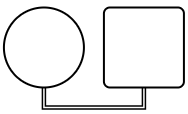 Consanguineous
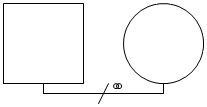 Married
separated
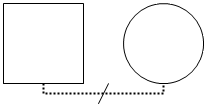 Living Together
separated
Children & Pregnancy
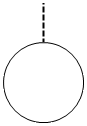 Adopted child
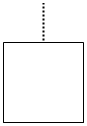 Foster child
 Pregnancy
 Miscarriage
 Abortion
 Stillbirth
Twins
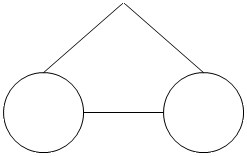 Monozygotic
(identical)
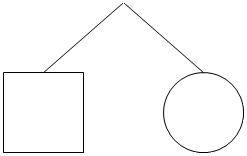 Dizygotic
(fraternal)
advertisement
Sample Genogram
This example walks through building a three-generation genogram step by step. The family is set up as follows:
- Tom (40) is the son of Marge (65) and Michael (67), who married in 1980 and divorced in 2000.
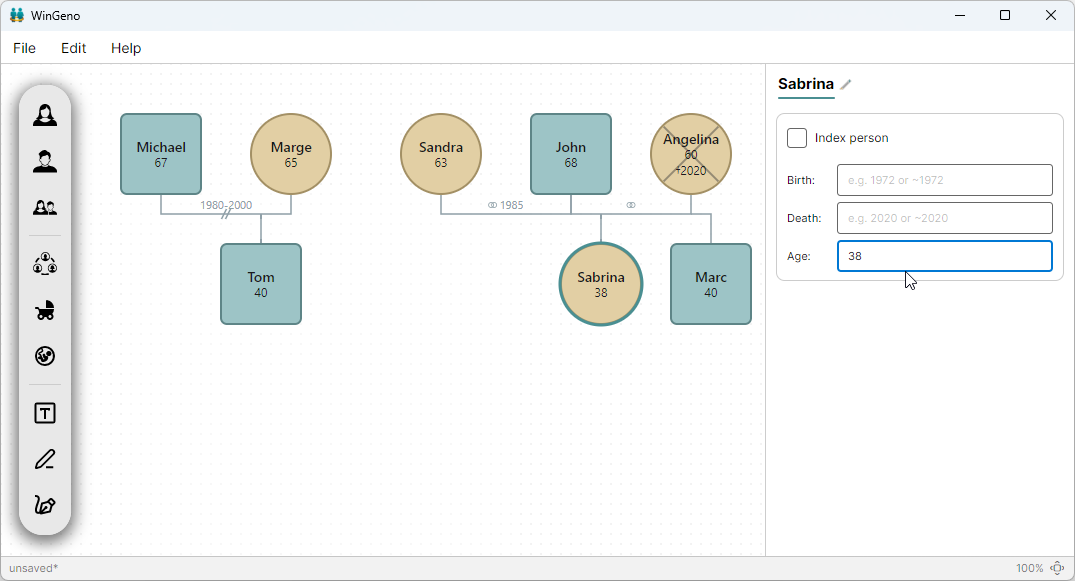
- Sandra (63) and John (68) have been married since 1965. Before that, John was married to Angelina (60), who died in 2020. John and Angelina had two children: Marc (40) and Sabrina (38).
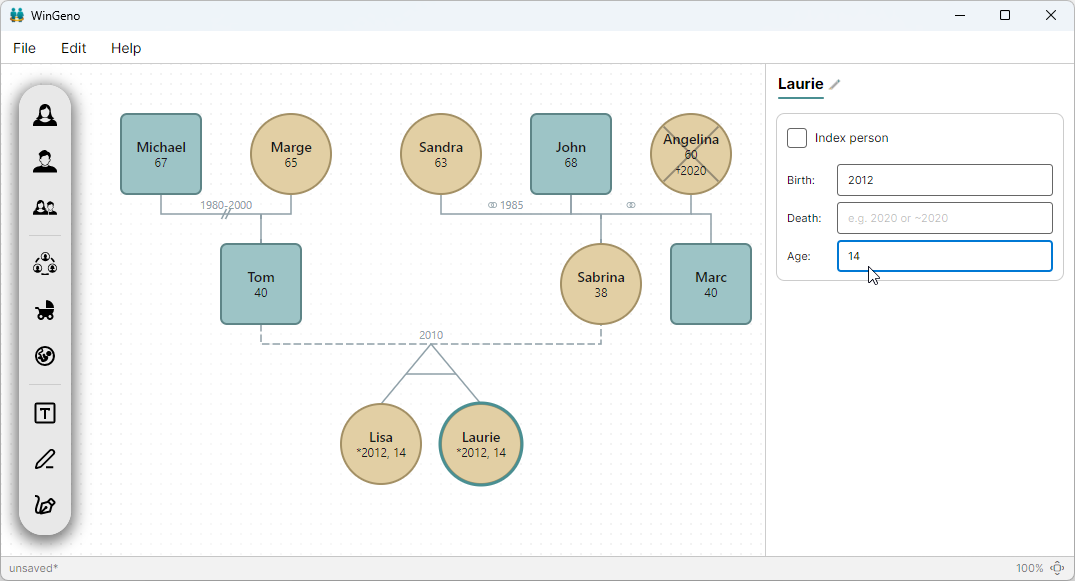
- Sabrina and Tom have been living together since 2010. In 2012 their monozygotic twin daughters Lisa and Laurie were born.
Step 1 — Place Marge and Michael
Click Female in the toolbar and place Marge on the canvas. Click Male and place Michael. Select each symbol and enter their names and birth years (or ages) in the Properties panel.
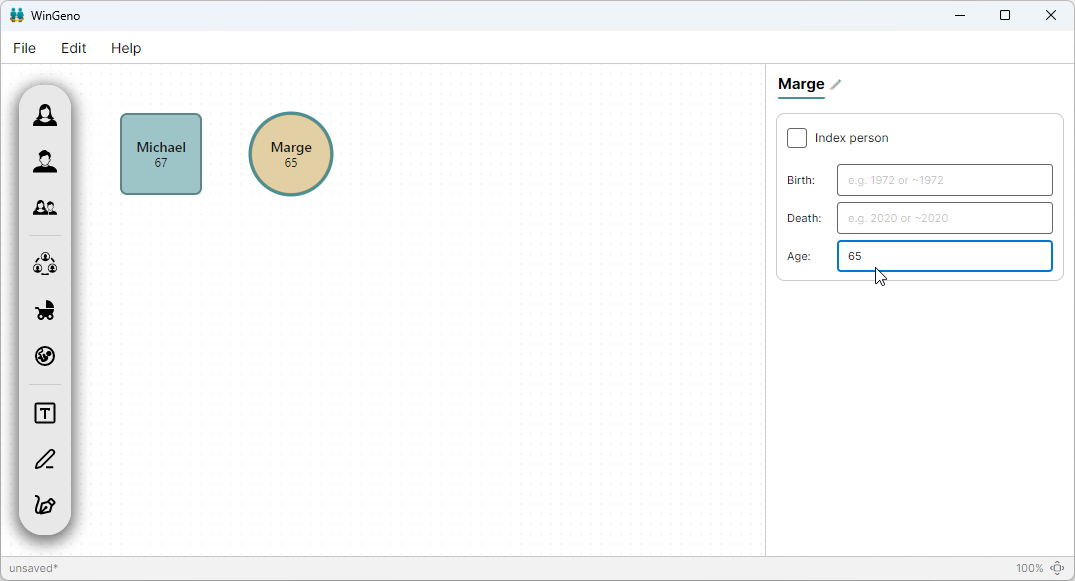
Step 2 — Connect Marge and Michael
The two symbols for Marge and Michael need to be selected. Then the relationship can be done via the Context Menu or the Toolbar.
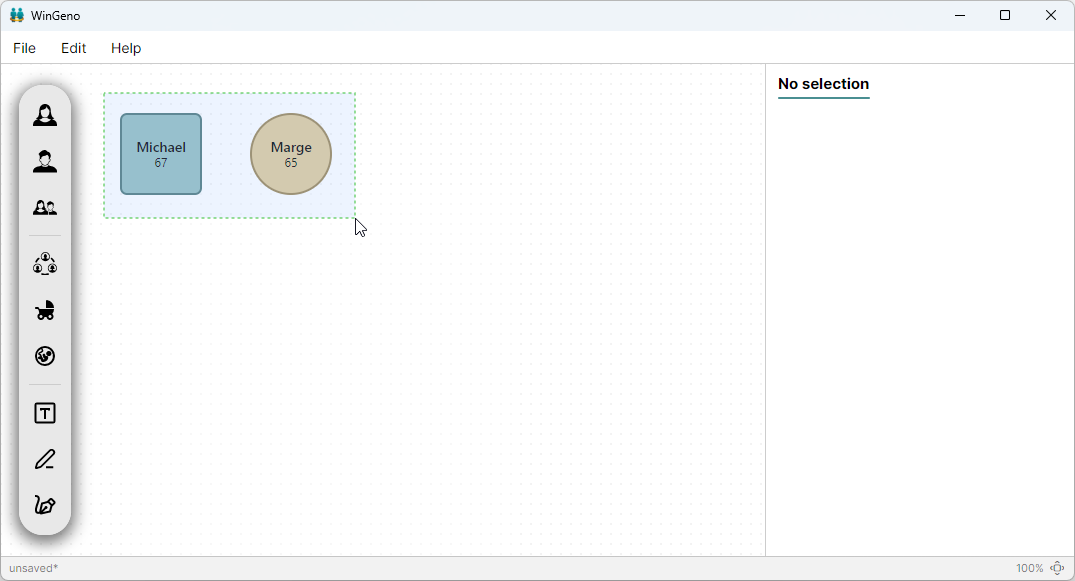
Step 3 — Insert time of marriage
The relationship between Marge and Michael needs to be selected to change the time of marriage. After that the information regarding the relationship can be changed in the Properties panel. Select the connection line and enter 1980–2000 in the Date field.
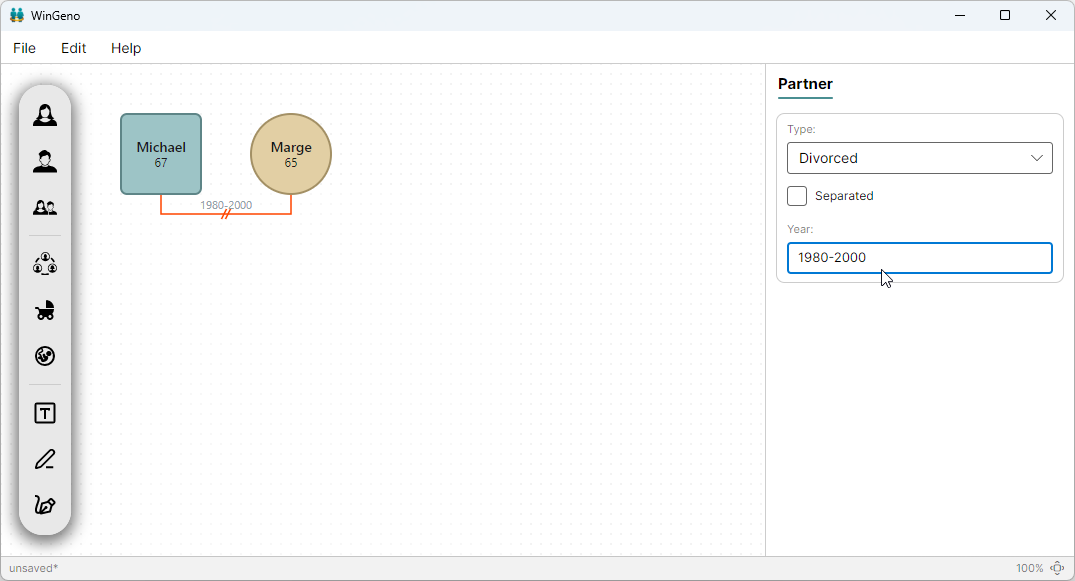
Step 4 — Add Tom as their son
Select the partner connection line between Marge and Michael. Click Add Child → Male Child (Biological). Select Tom's symbol and enter his name and birth year.
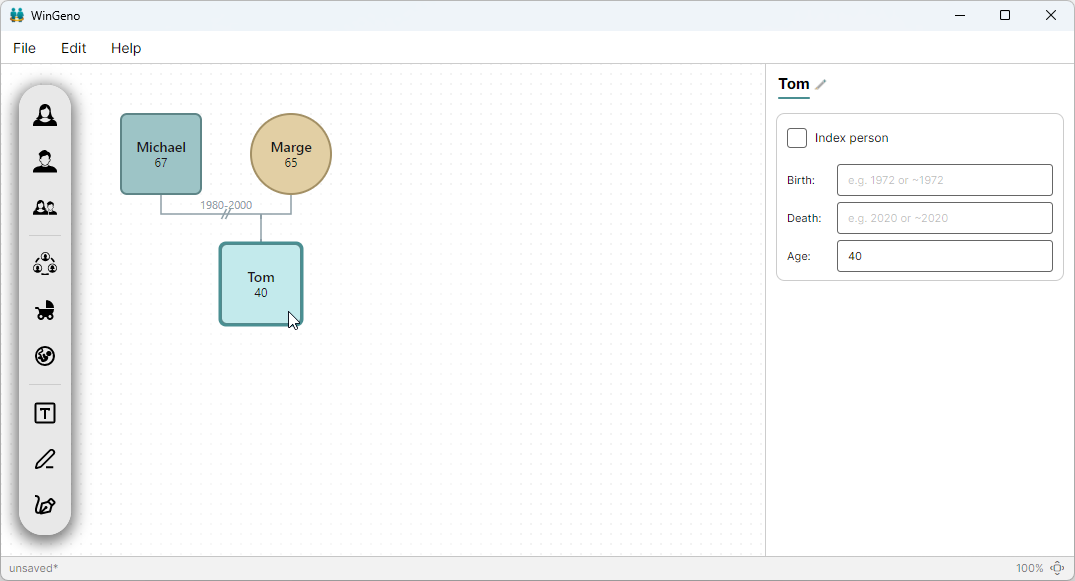
Step 5 — Place Sandra, John, and Angelina
Place a female symbol for Sandra, a male symbol for John, and a female symbol for Angelina. Enter their names and details in the Properties panel. Mark Angelina as deceased (enter her death year).
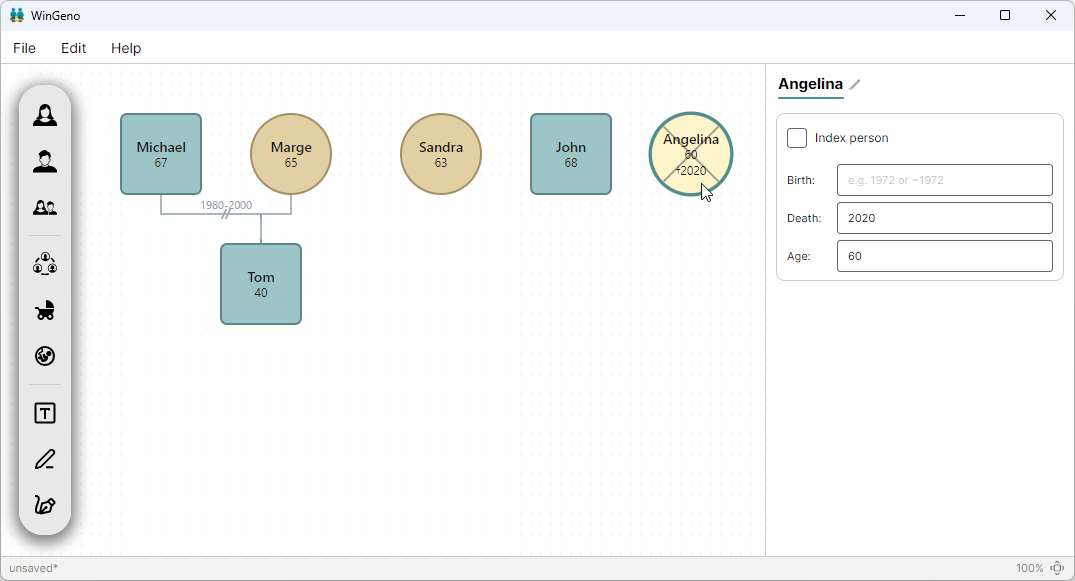
Step 6 — Connect the couples
Ctrl+click Sandra and John → Partner Connection → Married. Enter date 1985. Ctrl+click Angelina and John → Partner Connection → Married. Remove or leave the date blank (unknown).
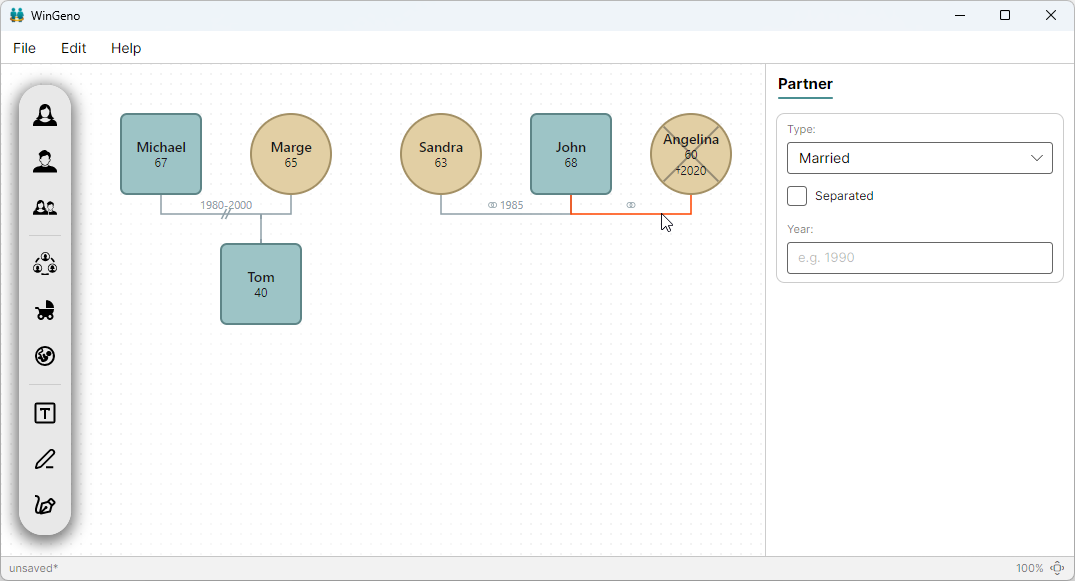
Step 7 — Add Marc and Sabrina as children of Angelina and John
Select the Angelina–John connection line. Click Add Child → Male Child for Marc, then again for Female Child for Sabrina. Enter their names and birth years (or ages).
Step 8 — Connect Sabrina and Tom
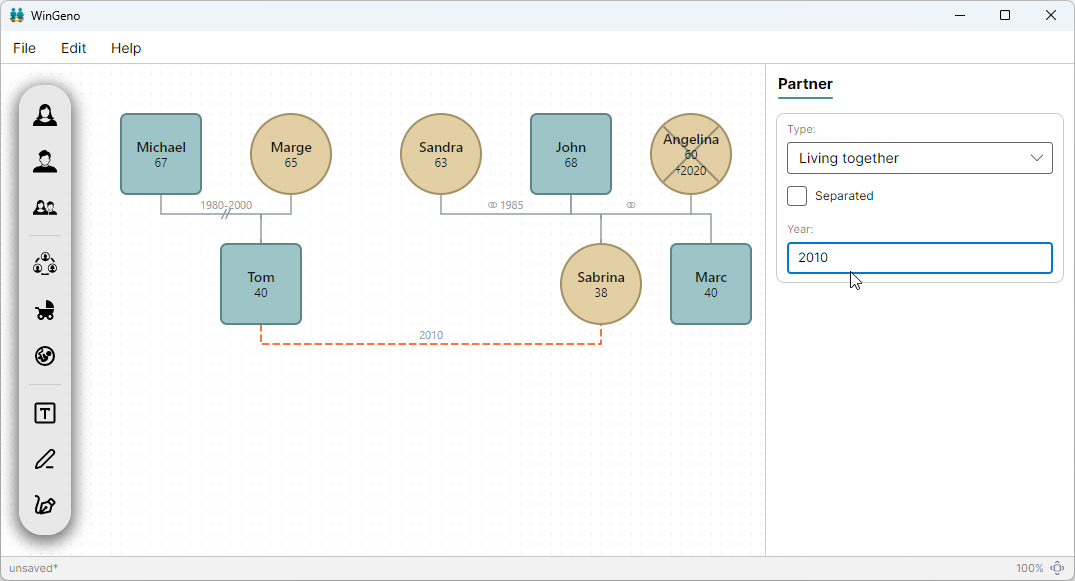
Ctrl+click Sabrina and Tom → Partner Connection → Living Together. Enter date 2010.
Step 9 — Add Lisa and Laurie as monozygotic twins
Select the Sabrina–Tom connection line. Click Add Child → Female Child to add Lisa. Add Laurie the same way. Then Ctrl+click both Lisa and Laurie and click Partner Connection → Monozygotic Twins. Enter birth year 2012 for both.
Step 10 — Mark the index person
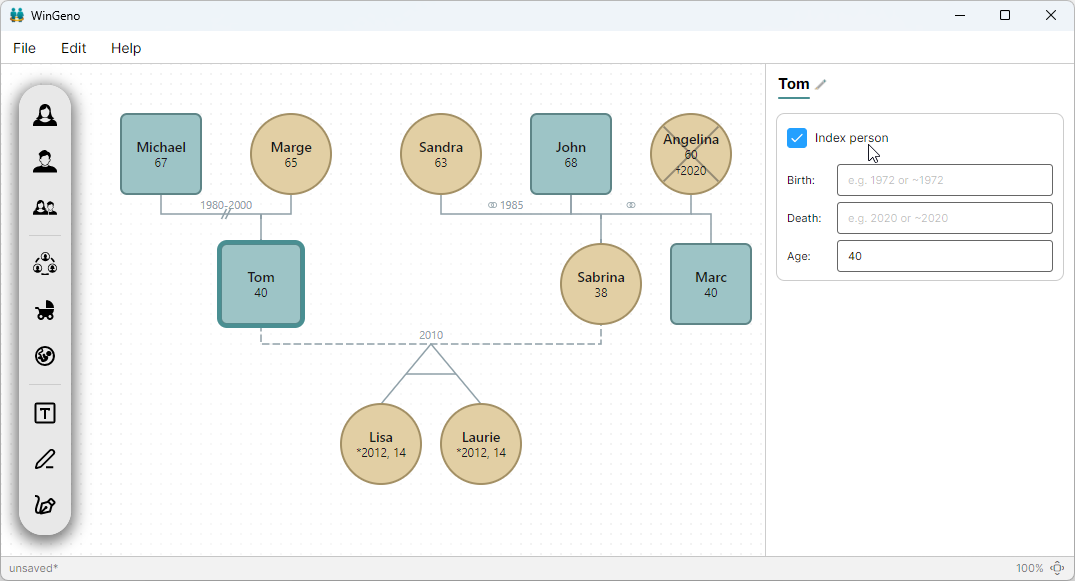
Click Tom's symbol and check Index person in the Properties panel. Tom is the subject of this genogram and will be highlighted with a distinct border.
Step 11 — Save
Use File → Save As to save your genogram as a .geno file. Use File → Print to save as PDF, or File → Export to save as PNG / JPG.
Problem Report
Please download the latest version of WinGeno from wingeno.app and confirm the issue persists before reporting.
Crash log
If WinGeno encounters an unexpected error, it automatically writes a local log file to your device. No patient or client information is ever logged. The log file never leaves your device unless you actively choose to send it.
When WinGeno detects that the previous session ended unexpectedly, it will ask you on the next start whether you want to send a report. Your email client will open with a pre-filled message — nothing is sent automatically.
You can also find the log file manually:
- Windows:
%AppData%\WinGeno\crash.log - macOS:
~/Library/Application Support/WinGeno/crash.log - Linux:
~/.config/WinGeno/crash.log
Sending a report manually
When sending a problem report to support@wingeno.app, include the following information:
- Operating system — name, version (e.g. Windows 11 25H2, macOS 26.5.2, Ubuntu 26.04)
- WinGeno version — shown in Help → About
- Description — exact steps to reproduce the problem
- Log file — attach the latest
crash.logfile from the logs folder above (if present) - Attachments — screenshots and/or the
.genofile that triggers the issue (if applicable)